| Register
- Verification |
 |
|
| Home
Menu |
 |
|
| |
|
Register
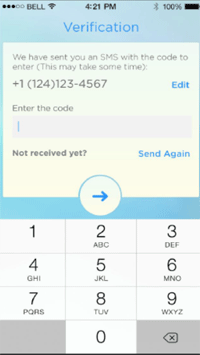
When you first open up imgr, you will
register with your phone #.
Enter your phone # and tap the arrow.
Verification
imgr will send you an SMS Text Message
to your phones native text message
(iMessage) app with a verification
code. This is to verify that you are
the owner of the phone # that you
provided. Once you receive the code,
enter it here, and Tap the Arrow.
( If you are experiencing trouble
receiving the SMS Authorization Code
to activate your imgr account, please
go
here >)
Once
successful, you can complete the rest
of your profile, or finish it later.
Tap on the Checkmark after
you have completed your profile to
continue. imgr
will ask if you would like to receive
push notifications, and will ask if
you would like to sync your contacts.
We recomend that you sync your contacts
that way you can begin chatting with
your friends and contacts who are
already imgr users.
|
|
|
| |
|
| Contacts
- All |
 |
|
| Contacts
- IMGR |
 |
|
| |
All (Contacts)
When you sync your contacts, all of
your phone contacts will be pulled into
imgr and will be displayed in your "All"
tab. Your contacts who are already imgr
users will be labeled (imgr).
IMGR (Contacts)
Any of your contacts who are current
imgr users will be displayed in your
IMGR Contacts tab. You can begin chatting
with any of these contacts. Tapping
on their photo or name will start
a chat. Tapping on the "i"
icon will bring up their profile.
Don't
forget to invite your other friends
who have not discovered imgr yet.
You can easily invite them by tapping
on the "Invite"
button.
When
a contact that you invited to imgr,
downloads imgr and registers, you
will then see them listed in your
IMGR Contacts tab, and can then begin
chatting with them.
|
|
|
| |
|
| Contact
Profiles |
 |
Edit
Contact Profile
Go to Contacts > Tap the "i"
icon next to the contact you would like
to edit.
You can customize each one of your contacts
profiles and determine how each individual
will recieve your promos.
Promos
ON/OFF.
If turned "OFF", No promos (sponsored
& personal) will be placed in the messages
you send to them. Note: You will have the
option of adding a promo if desired when
composing your message.
Auto Rotate ON/OFF.
You can turn ON/OFF auto rotate promos for
that individual. If turned "OFF"
the same promo (last one you sent) will
always be inserted into the message. Note:
you will have the option to change it when
composing your message.
Sponsored Ads.
You can Enable/Disable Sponsored Ads for
the individual contact. If "Disabled"
no sponsored promos will be included in
auto rotation for that contact. Note: You
will have the option of adding one when
composing your message.
Personal Promo.
You can Enable/Disable Personal Promos for
the individual contact. If "Disabled"
no personal promos will be included in auto
rotation for that contact. Note: You will
have the option of adding one when composing
your message.
|
|
| |
|
| Messages |
 |
 |
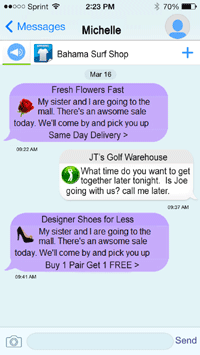
This
is where all the fun starts. You can begin
chatting with your friends and contacts.
By default imgr will auto rotate the Promos
into the messages that you are sending.
The chat screen on the left show examples
(in green bubbles) of Personal Promos that
were created by your contact "Steve"
within the imgr app and sent to you. The
chat bubbles in purple on the right are
examples of Sponsored Promos. Users can
earn CA$H when sending Sponsored Promos.
Promo
Display Bar at the top:
The promo that is next in line to be inserted
will be displayed at the top of your message
screen. From there you have 4 options:
1.
You can leave it as is, and the promo displayed
will be inserted.
2. Swipe on the promo to go to the next
promo in the rotation.
3. Select a specific promo by taping the
"+" icon and select one of your
choosing.
4. Tapping on the bull horn icon will disengage
(Turn OFF) promos for that message and no
promo will be included.
|
|
| |
|
| Settings |
 |
|
| >Promo
Settings |
 |
|
| |
|
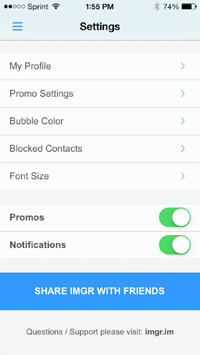
Settings
You can customize your settings:
1. Set your Profile. Name, Photo,
and Email.
2. Promo Settings (see promo settings
below)
3. Bubble Color. You can choose the
color of your chat bubble that will
be visible to your friends. (Green,
Purple, or Blue)
4. Block Contacts who you do not want
to receive messages from.
5. Font Size. Set your font size.
6. Promos. You can turn all promos
ON/OFF for the entire app.
7. Notifications. ON/OFF
Promo
Settings
1. Turn sponsored promos ON/OFF for
the entire app.
2. Deselect sponsored ads that you
don't want to include.
Go to: View/Edit Sponsored Ads
> Edit > Select/Deselect
3. Create your own personal promos
(see section below)
4. Turn auto rotate promos ON/OFF.
When auto rotate is "ON"
all of your promos including any personal
promos created will automatically
rotate into your messages in random
order.
|
|
|
|
| Create
New Personal Promo |
 |
Go
to: Settings > Promo Settings >
View/Edit Personal Promos > Create New
Promo
Promo Image/Icon:
This is a small image or icon that will
be displayed within the top left corner
of your message bubble. You can select images
from your camera roll, or from available
imgr images. The imgr icons are sized exactly
to fit within the application (34 pixels
X 34 pixels). If you choose images from
your camera roll, the app will reduce the
size to 34 X 34 in order to fit within the
app. If your image is square, then it will
simply resize smaller. (Ex. Blue "Like"
Thumb)
Promo Name:
This is the "Name" of your promo
that will display in your personal promo
list. It will not appear in the promo received
by your contacts. It is only for your reference.
(Ex. My Page)
Header/Promo Message:
This will appear in the top shaded area
of your promo that will be visible when
received by your contacts. (Ex. Like
My Page). Note: This field has a
maximum of 24 characters in order to fit
on one line in the message bubble.
Link (URL):
This is the actual live link that is behind
the Link Text. If your contacts taps on
the footer (Link Text), they will go to
your destination website url. Example: http://my-page.com/jennifer24
(there is no character limit on the url)
Note:
You do not have to have a link text and
link url. But you cannot have one without
the other.
Link
Text: This is the text that will
be displayed in the bottom/footer area of
your message bubble and will be viewed by
your contacts. (Ex. Tap
Here to Visit >) Note: Maximum
24 character limit.
|
|
 |
 |
|
This
is how the personal promo that you
just created (above) will look to
your contacts. If they tap on the
bottom link "Tap Here to Visit
>" they will go directly
to your website, or social media page.
In
this example you also chose the "Green"
bubble color in your settings. You
can select from Green, Purple, or
Blue.
imgr
is the only instant messaging app
that lets you determine how others
will view your message.
View
the create your personal promo instructional
video >
|
|
|
| |
|
|
| |